Library Module
Feature 1: New Report Added- Book Available Details
We have introduced a new report in the Library Module titled "Book Available Details" to help librarians and administrators efficiently track book availability.
How It Works:
- ? The "AttendancePercentage" tag for fetching the student's data in the certificate.
- ? Choose the Category (e.g., Autobiography, Fiction, Art, Political, etc.).
- ? Click Display, and the report will be populated in the grid section:
- Category Name
- Total {collection}
- Total Available {collection}

Benefits for Librarians & Admins:
?? Efficient Inventory Tracking :
Easily monitor stock levels for different collection types and categories
?? Better Resource Planning:
Helps librarians manage book availability and procurement
decisions.
Check out the "Book Available Details" report now for a streamlined library experience! ??
Feature 2: Print Multiple Bar Code on One Page
We have introduced the feature of barcode generation in bulk in the Library Module, making it easier to create and print barcodes for library collections.
How to Use It:
- Navigate to Library Module > Library Reports.
- Click on "Generate Barcode" to open a new interface.
- Select the Collection Type (Books, Magazines, Journals, etc.).
- Choose the Prefix and click Display to generate barcodes.
- Set the Orientation and Page Size as needed.
- Click Print, and the barcode will open in a new tab with the print option.

Benefits:
- Quick Barcode Generation : Simplifies cataloging and tracking of library items.
- Customisable Printing Options : Adjust orientation and page size as per requirements.
Start generating barcodes today for a more organised library system! ????

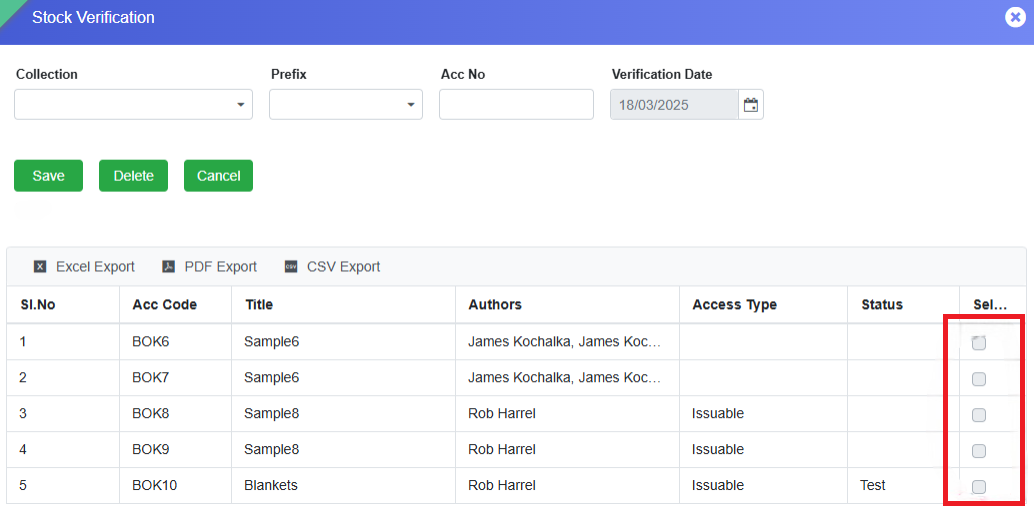
Feature 3: New Page- "Stock Verification" in Library Module
We have added a new "Stock Verification" page in the Library Module to help administrators efficiently verify library stock and maintain accurate records.
Navigation:
?? Go to Library Module > Task Menus > Stock Verification
How It Works:
- ?Select type of Collection and Choose Prefix.
- ?The grid will display all items row-wise based on the selected filters.
- ?Navigate to the Select column.
- Double-click on the checkbox to activate selection.
- Single-click to mark items for verification.
- To select an entire row, click on the Select Header.
- Click Save ' The selected items will be instantly verified, and the corresponding rows will be removed from the grid.
Impact:
The Stock Verification Date is captured in the ERP system.
All verified items will appear in the Stock Verification Detail report.
Users can generate this report from the Library Reports page using relevant filters.
This feature enhances library inventory management by ensuring an accurate and up-to-date stock record. Check it out now! ???
This update helps administrators and staff quickly review student attendance records at a glance. ???
Feature 4: New Page- Late Fine Collection
A new page, Late Fine Collection, has been added to the Library Module. This page enables librarians to verify the due amount and paid amount of a student and to collect or relieve fines for overdue library items. It functions as a centralised interface to manage fines for all items issued to a student.
Additionally, any fine paid by the student through the Issue/Return Collection page is reflected on this page. The primary objective of this feature is to verify if a student has already paid the fine while returning a book; if not, the librarian can collect the pending fine based on the item's return date.
Navigation Path
Library Module ? Task Menus ? Late Fine Collection
Key Features
- Allows librarians to verify and collect late fines for issued and returned library items.
- Displays all issued items for a student along with their due date and fine details.
Workflow
-
Search the Member:
- Select Member Type (e.g., Student).
- Enter Admission Number and press Enter.
- All the issued items will be displayed in a grid view, along with Due date, Return Date, Fine date, Fine Paid, and Fine to be Paid (Paid Amount).
- Two sections appear - Member Details and the Late Fine Collection.
-
Edit Fine Collection Details:
- In the grid, navigate to the Action column and click the pencil icon >>> The data from the grid will be populated in the "Late Fine Collection" section.
- Click on 'Edit' button >>> Within "Late Fine Collection" section, Date, Paid Amount, and Remark fields will be enabled for editing.
-
Update Fine Payment:
- Enter the Date of Fine Collection (defaults to today's date).
- Enter the Paid Amount in the respective field.
- Add any Remark if needed.
- The Fine Paid (read-only field) will automatically update based on the total due amount.
- Calculation: Fine paid = Existing Amount + Paid Amount

-
Save the Changes:
- Click the Save button to confirm the payment.
- The fine amount will be updated in the ERP system and reflected in the 'Fine Paid' column in the grid section of the student upon whom the operation is performed.
For any assistance, please contact the support team.